Tuesday, 23 August 2011

Studs on Black Leather Nail Art - WAH Nails

Hello everyone,

I have just come back from London where I did loads of shopping so you can expect loads of posts from me in the next few days.

I have been loving my nails!!! I am a make up addict but nails are my biggest passion! I have been doing my own acrylics for the past 4 years and been loving nail art as well. This time I got inspired by WAH Nails and recreated their design.

WAH Nails - Studs Design £39

And this is my attempt:

My attempt, £5


I cannot believe that WAH nails charge £39 just for the nail art!!! It doesn't include acrylics or gels, just the polish! I managed to recreate it and spent nowhere near as much money. All you need is black nail polish and some studs! Unfortunately I didn't have any but was desperate to recreate the look so had to be creative. I used half pearls and painted these gold. If you would like to see exactly how I did this, watch the video here: http://www.youtube.com/watch?v=6FTraGxmhYE

Speak to you soon

Kate x

Monday, 15 August 2011

Free Make-Up? Yes please! Rimmel Vinyl Glosses and Eye Shadow

Hello everyone,

today I have been feeling really down because I am mega poor and still haven't managed to find a job since I graduated. So this means NO SHOPPING, which is probably even more depressing! :-/ However as I was opening my post I discovered, apart from all the bills, a Tesco Club Card voucher! This was only worth £5 but when I read the leaflet it came with I quickly realised that I can exchange it for twice as much in store, simply by choosing a specific category. Well that wasn't hard, of course it was going to be beauty! :-) This got me quite excited so I decided to go to tesco's straight away! And oh my goodness once I got there I literally couldn't choose! I wanted EVERYTHING! I spend over an hour deciding on what to get! In the end, I noticed Rimmel had 3 for 2 offer so I went for that. 

My FREE Make-up

This is what I decided to go for in the end. I bought two of the Vinyl Glosses in colour Cosmic (730) and Take a Chance (130) and a Mono eyeshadow in Tribute (130). I already had a Vinyl Gloss (in Snog) from Rimmel and I love it, so that's why I decided to get 2 more. And for the eye shadow, the colour is sooo pretty and  nicely pigmented and reminds me of Toasted by Urban Decay (from the Naked Palette).

Snog (330) - top, Cosmic (730) - middle, Take a Chance (330) - bottom

 And here are the swatches for all three of them.
Take a Chance - left, Cosmic - middle, Snog - right

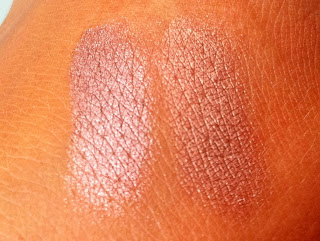
And now the swatch for the eye shadow.
Rimmel Glam'eyes Tribute 130

Here you can see it compared to Toasted from Urban Decay. It is slightly more purple/pink but a very close match. The consistency feels the same too! 
Rimmel Tribute - Left, UD Toasted - Right

 I am over the moon with my purchase. Well not really a purchase, I didn't pay for it! :-) In the end, I managed to get myself £14.47 worth of make up! The glosses are fantastic, they feel a little sticky but most lipglosses do. The colours are beautiful and I quite like the packaging too! The eye shadow is also amazing. I usually go for the more expensive brands like Urban Decay but this is equally as good and I am loving this colour, especially for the summer! Hope you found this helpful and that you can get your hands on some of these vouchers too! 

Have a lovely week!
Kate x

Saturday, 13 August 2011

J Lo inspired make up

Hi everyone,

I have been loving blogging and have soo many ideas that I don't know where to start! But this summer J Lo has been absolutely massive, not only because of her divorce with Marc Anthony but mainly for her appearance on American Idol. She is back and looks better than ever. Her bronzed look has been her staple look for many years so I will try to recreate it. Please bare in mind that it is impossible for me to look exactly like her or use exactly the same colour as my skin colouring and hair is different so I have to adjust the look so it compliments me. :-)

J Lo's inspired make up
Start by applying a primer all over the lids. The one below is amazing!
Urban Decay Primer Potion

Then I used MUA eye dust in shade 5. This is fantastic for creating that bronzy/brown look. Just sweep it all over the eye lid and below the eyes as well. It can be purchased from Superdrug and costs only £1. This is a good way of getting into loose shadows! 

MUA eye dust shade 5 £1
The next step is highlighting the brow bone and tear duct. This lifts the eyebrow and creates the illusion of bigger eyes! I used another shadow from the MUA collection, but this time in a pressed form.
MUA eye shadow shade 1 £1
In this picture J Lo is wearing really dark eyeliner, this makes the bronzy tones pop. For your waterline use Avon SuperShock eyeliner in black - this is the BLACKEST eyeliner I have ever come across! For the liquid eyeliner I used L'oreal's Super Liner in carbon black. Make sure you wing it out like J Lo did.

Now curl the lashes and apply your mascara. I am using these 3 below. They all do different things and the finish result is much better than just using 1 mascara.

Now fill your brows in. I used my favourite eyebrow kit from elf. J Lo's brows look quite natural so don't over do it! :-) BUT also bare in mind that brows frame your face so make sure they stand out at least a little.
ELF eyebrow kit £3.50 and ELF small angled brush £3.50
Now the eyes are finished you can put your foundation on and conceal necessary areas. Then use the following brush for the cheeks.
No7 Powder Blush Brush £11.50
Firstly, use the brush to contour the cheeks. The face contour kit from sleek is great! Use to bronzer in the hollows of your cheeks to make the face look slimmer, then bring it up a little bit on the apples of your cheeks instead of a blusher.
Sleek Contour Kit medium £6.50
Secondly, use the No7 blush brush for your highlight. You can either use the one from the kit above or the one below. This is called Face & Body Highlighter in peach shimmer and it's also from Sleek. This one has a bit more colour in it so just make sure you get them all on your brush and then lightly sweep it on tops of your cheeks to lift them.
Sleek Face & Body Highlighter in peach shimmer £6.49
Line your lips with a nude lip liner. I purchased this one abroad so have no idea what it is called or how much it costs. Sorry! You can notice that on this specific picture J Lo is wearing a liner that's a bit darker than her lipstick.
Then use a nude lipstick and gloss over it. J Lo is famous for her nude glossy lips. I used nudes that were more on the pink side rather than browny as my colouring is different to J Lo's.
ELF mineral lipstick in runway pink £3.50 and Dior Addict Gloss in 247  £20

I really hope you enjoyed this tutorial. Let me know if you would like me to recreate any other looks. Below is the finished look. However the colours are a bit distorted because the eyes aren't nowhere near as dark and the lips are more nude. I took over 100 pictures on my camera and my iPhone but this is the best I got.

This look is sooo easy and cheap to achieve (minus the dior lipgloss but use any other nude lipgloss). I think it's lovely especially in the summer as it gives you nice healthy glow. I wore it on my holidays a lot! But it's definitely great for nights out or special occasions out all year around.

Thank You!!!

Kate x

Wednesday, 10 August 2011

Smoky eyes using NYX pigments

Hi all,

Today I am doing a really easy make up tutorial using NYX pigments. I have never used these before so had to experiment a little bit. Hope you like the look and please excuse my stupid tan. I only just got back from a holiday and the tan constantly makes me look dirty! :-D Also because I am so dark I didn't use a foundation or powder since none of the ones I have match my colour!

Smoky Eye Make-up
For more dramatic look use falsies!
I started by applying the Urban Decay Primer Potion all over my lid to make the pigments catch on.
Urban Decay Primer Potion £18 (but soo worth it, it lasts for ages!)
Then I used the NYX ultra pearl mania. I purchased these from eBay and they cost roughly £7 which is an amazing deal for 12 pigments! However I am not a big fan of the packaging as it makes it very difficult to get the pigments out. I might try and press them in the future. 
NYX Ultra Pearl Mania

I used the following two for this look: Black Pearl and Silver Pearl.

 Black Pearl and Silver Pearl
Swatches
 Pigments can be very tricky and messy to apply. I used these 2 ELF brushes. If you are planning on wearing foundation, apply it after you have finished your eye make up because even with brushes it will have fall out! Start by applying the silver pigment on the inner half of your eye, then wipe the brush into a paper towel to get rid of the silver pigment. This will make the black colour darker and the look more dramatic. Apply the black on the outer half of your eye. Then with the same brush, blend the middle bit. After your lid is done, take the crease brush and with the black go under the eye, going from outside inward. Stop about 3/4 from your tear duct. Clean your crease brush and dip it into the silver and then apply it around the tear duct area. 
ELF Blending Eye Brush and Eye Crease Brush (£1.50 each!!!)
 Now line your waterline using the NYX white pearl pencil. This is a nice alternative to using black. It will open up your eyes and make them appear bigger. Then use L'oreal Super Liner in Carbon Gloss to create perfect winged eyeliner. 
L'oreal Super Liner Carbon Gloss £6.19, NYX eye/eyebrow pencil 918 white pearl  £3.50 (available on eBay)
 To finish the eyes, curl your lashes and apply your mascara. I like to use a mixture because one mascara will never do everything. Some separate the lashes, some make them longer and some add volume. This tip has worked for me for years! After applying the mascara I would recommend to use falsies! They are definitely great with this look, although I am not wearing any on the pictures above.
Rimmel Sexy Curves £8.19, L'oreal Volume Million Lashes £11.29, L'oreal Lash Architect 4D  £10.99
 Now apply your blush on the apples of your cheeks. I have been struggling to find a blush that shows on my dark skin but this Avon True Colour Blush in Soft Plum is perfect. It comes in a lovely packaging with a big mirror and a small brush. Even though I usually use my own brushes this can be handy if you use it to reapply throughout the day.
Avon True Colour Soft Plum £6
Finally, put a lippy on and your lipgloss. I used ELF Mineral Lipstick in Runway Pink and ELF Super Glossy Lip Shine in Pink Kiss. These are super cheap but brilliant quality! 
ELF Mineral Lipstick Runway Pink £3.50, ELF Super Glossy Lip Shine Pink Kiss £1.50
Finally, I would recommend to use Mac paint in Bare Canvas instead of the primer potion, because its creamy consistency will hold on to the pigments better and will make the look last for longer whilst making the colours more vibrant! I hope you found this tutorial helpful. Sorry if I was mumbling on, but I thought I would share few of my tips as well. Future tutorials will definitely be more concise, I promise! :-)

Thanks for reading!
Kate x

Nail Art by Me

Hello again,

I thought I would upload all the nail designs I have done so far. I am really passionate about nails and even taught myself how to do gels and acrylics as I wasn't blessed with strong nails! I know it is bad for your nails but I never have them off so it doesn't really matter. You can find tutorials for many of these on my YouTube channel: www.youtube.com/KateHealthandBeauty I should maybe warn you that I am currently obsessed with polka dots so you will find quite a lot of them. SORRY! :-) Hope you enjoy this and please let me know if you would like me to recreate any design.

Water Marble


Barry M Instant Nail Effects

Polka Dot - Kids (my 10 year old sister)

Union Jack Nails - Perfect for Royal Wedding or the Olympics

Zig zag with dots

Newspaper Nail Art

Another Polka dot using Barry M mushroom

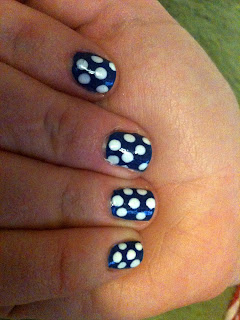
Navy Polka Dot on short nails

Rainbow design - summer favourite

Beyonce's nails from Telephone video

Another Polka dot - baby blue 


Purple polka dot

Strawberry nails - you either love it or hate it!

Lots of Love
Kate x

Hello and First Blog post

                                               
Hello to all beauty lovers out there!

I have decided to start my own blog after having an amazing success with my you tube channel. I absolutely love talking about beauty, trying out new products and last but not least applying make up. I am obsessed with changing my look so one day you might see me with blonde hair and another with black. I think change makes life sooo exciting. On my blog I will be doing a lot of nail tutorials, make up tutorials and product reviews including swatches. This is one of the main reasons for having a blog as well as a you tube channel as the swatches never come out right on the video. I will even try to do a few hair tutorials, because I am in love with hair tools! I really hope you will enjoy reading my blog and I will always appreciate any comments and even criticism.


Lots of Love
Kate x